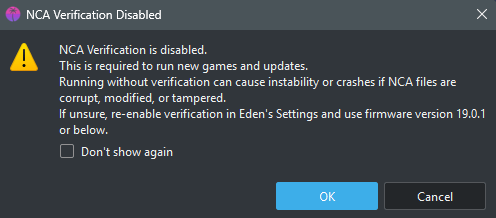
The “NCA verification disabled” warning in the Eden Emulator is not just a simple notification—it signals that the emulator is currently bypassing integrity checks for Nintendo Content Archive (NCA) files. While this may allow some games to run, it introduces serious risks, including crashes, graphical issues, and inconsistent behavior.
From a systems perspective, NCA verification ensures that game data is authentic, complete, and properly decrypted. When verification is disabled, the emulator cannot guarantee data integrity, which compromises stability and accuracy.
This guide provides a structured, expert-level approach to diagnosing and fixing the issue while maintaining a clean and stable emulation environment.
- 1 What Does “NCA Verification Disabled” Actually Mean?
- 2 Root Causes of “NCA Verification Disabled”
- 3 Fix 1: Update Eden Prod.Keys
- 4 Fix 2: Install or Update Eden Firmware
- 5 Fix 3: Verify Game File Integrity
- 6 Fix 4: Avoid Converted or Trimmed Files
- 7 Fix 5: Check File Paths and Folder Setup
- 8 Fix 6: Reset or Reinstall Eden Emulator
- 9 Fix 7: Clear Cache and Rebuild Emulator Data
- 10 Final Thoughts
What Does “NCA Verification Disabled” Actually Mean?

Inside Eden Emulator, every game file (NSP, XCI, or NCA) goes through a verification process before it runs. This process checks two things:
- Whether the file is authentic and unmodified
- Whether the emulator can decrypt it using available keys
If the emulator cannot verify this information, it disables NCA verification and blocks the game from launching. This is not a bug—it’s a safety mechanism to prevent crashes or invalid execution.
Root Causes of “NCA Verification Disabled”
Before applying fixes, it’s critical to identify the underlying issue. In most cases, this warning is triggered by one or more of the following:
1. Outdated or Missing prod.keys
Keys are required to decrypt NCA files. If they are outdated or missing, verification cannot be performed.
2. Firmware and Key Mismatch
Each firmware version expects a corresponding set of keys. Mismatched versions break validation.
3. Unsafe or Debug Settings Enabled
Certain experimental settings disable verification to improve compatibility but reduce stability.
4. Corrupted or Modified Game Files
Invalid or altered NCA files fail integrity checks.
5. Incomplete Game Dumps
Partial or improperly dumped files cannot pass verification.
Fix 1: Update Eden Prod.Keys
Start with the keys because this is the most common root cause.
Open the main folder of Eden Emulator and locate the “keys” folder. Delete any old key files and replace them with the latest prod.keys file.
Make sure:
- The file name is exactly prod.keys
- It is not saved as a
.txtfile - It matches the latest firmware version
Once done, restart the emulator. In many cases, this alone fixes the issue instantly.
Fix 2: Install or Update Eden Firmware
Keys alone are not enough. The emulator also needs the correct firmware environment.
Install the latest firmware supported by Eden Emulator. Newer games require updated system libraries, and without them, verification fails.
After installing firmware:
- Restart the emulator
- Reload your game library
Always keep this rule in mind:
👉 Keys version and firmware version must match or be compatible
Fix 3: Verify Game File Integrity
If your keys and firmware are correct, but the error still appears, the problem is likely your game file.
Check the following:
- File format is NSP or XCI
- File is fully downloaded (not incomplete)
- File is not modified or repacked
If you’re unsure, try:
- Re-copying the file
- Re-dumping the game properly
- Avoiding compressed or trimmed versions
A clean file is critical for proper verification.
Fix 4: Avoid Converted or Trimmed Files
This is something many users overlook.
Converting files (XCI → NSP or vice versa) using third-party tools often breaks the internal structure of NCA files. Similarly, trimming files to save space can accidentally remove important data.
Even if the file looks fine, the emulator may reject it due to header inconsistencies.
👉 Always use original, untouched game dumps for best compatibility.
Fix 5: Check File Paths and Folder Setup
Sometimes the issue is not the file itself but where it’s stored.
Make sure your game files are placed in:
- A simple directory (like Documents or a Games folder)
- A path without special characters or long names
Also verify:
- Game directory is properly added inside the emulator
- Keys folder is correctly placed
- Firmware is installed in the correct location
Small path issues can silently cause verification failures.
Fix 6: Reset or Reinstall Eden Emulator
If nothing else works, the emulator setup itself might be the issue.
Download the latest version of Eden Emulator and reinstall it. This helps eliminate bugs, broken configurations, or outdated files.
After reinstalling:
- Add fresh prod.keys
- Install firmware
- Re-add your game directory
This gives you a clean environment to test again.
Read also: How to Set Up Eden Emulator on Android
Fix 7: Clear Cache and Rebuild Emulator Data
Over time, cached data inside Eden Emulator can become outdated or corrupted. This may interfere with how the emulator verifies NCA files, leading to errors like “NCA Verification Disabled.”
Cached files are meant to improve performance, but when they don’t match your current keys, firmware, or game data, they can cause unexpected conflicts during validation.
What You Need to Do
Start by opening the main installation directory of Eden Emulator. Inside this folder, look for cache-related directories.
Delete the following:
- Shader cache (usually stored in a folder named
shaderorcache) - Temporary cache files
- Any old or unused compiled data
Once you’ve cleared these files, restart the emulator. On launch, the emulator will automatically rebuild fresh cache data based on your current setup.
Read also: How to set up Eden emulator
Why This Works
Cache files are generated using previous configurations. If you’ve recently updated your prod.keys, firmware, or game files, the old cache may no longer be compatible.
By clearing it, you remove outdated data and allow the emulator to rebuild everything from scratch. This often resolves hidden conflicts that prevent proper NCA verification.
Pro Tip
If you’re troubleshooting multiple issues, clearing the cache should always be one of the final steps after updating keys and firmware. It ensures your setup is fully clean and synchronized.
Final Thoughts
The “NCA Verification Disabled” error might look technical, but in most cases, it comes down to a simple mismatch between your setup and what the emulator expects.
If you focus on the basics—updated prod.keys, correct firmware, clean game files, and a properly configured emulator—the issue becomes much easier to fix. Small things like clearing the cache or avoiding modified files can also make a noticeable difference.
The key is to go step by step. Start with your keys, then check firmware, and finally verify your game files and emulator setup. Once everything is aligned, the emulator can properly validate NCA files, and your games should run without interruptions.
In short, this error is less about complexity and more about consistency. Keep your setup clean, updated, and in sync, and you’ll avoid most verification-related problems altogether.